Quickstart: How to play
Welcome to a quick how to play of Blood and Salt! For these rules we recommend using a full set of dice (from d4 to d20 + d%) and any upcoming Captain’s Starter Deck or the Print & Play Luwal Welcome Deck found here. These decks will have all the cards you will need to start the game. For the full breakdown of how to play, keep a look out for our upcoming comprehensive rules.

set-up
Put your chosen Captain and all of your Crewmembers into positions of your choice within your side of the playing field. This forms your Crew. For the Print & Play, this would just include Luwal.
Place your Captain’s weapon(s), warship, and Philosopher’s Stone into the playing field. Take all other equipment, weapons, provisions, and artifacts and set them aside to create your Crew’s inventory. Your inventory will not be used for this set-up.
Take all settings and set them to the side face-down to create your path deck. These will be the cards used to create the setting path Players will travel along. Players will not be able to see each other’s path deck.
Take your full set of dice from d4 to d20, or if you are using electronic dice, 6 counters, and place them in a horizontal line along the Stress Dice Zone on your side of the playing field.
Take your main deck and shuffle it. We recommend allowing your opponent to then shuffle or cut your deck.
Place cards in your Sanity Stack from the top of your deck equal to your Captain’s Stress Limit represented by the light red half orb on your Captain card and then draw cards equal to your Captain’s Sanity represented by the blue orb on your Captain card and you are ready to start the game!
To determine which character travels first, one Player will take either 1 or 2 stress counters and bid them. The other player will then guess odd or even. If guessed correctly, the guessing Player determines who sails first and gives those stress counters to that Player’s Captain. If guessed incorrectly, the bidding Player determines the same. Then, set your sails for victory!

Winning the Game
There are 3 main win conditions in Blood and Salt TCG:
Eliminate all opposing Captains by taking their Health (Dark Red) or Stress Limit (Light Red) to 0.

Sink opposing warships while they are at sea by taking their Health (Dark Red) to 0.

Travel to and survive the last flooded settings of the of the game first.

Wounding a Character or Warship
Damage is dealt as “Threshold Damage”, damage that results in additional wounds or other damage to targets as multiples of their strength are met.
When attack rolling in Blood and Salt TCG you will roll 2 dice:

Constant Die (d% or d10)

Variable Die (non-d%)
These two dice will add together using the following formula:
[(1st Digit of the Constant Die value + Variable Die value) + Strength of the card used] / Strength of the Target
Let’s look at an example of a character on the left attacking a character on the right who has played Overwhelming Force which has a strength of 10. Since it has a strength of at least 10 it can roll a d10.

The calculation of this roll would be: [(3 + 5) + 4] / Strength of the Target (11+1)
= 12 attack value / 12 Strength
= 1 Wound Dealt
If this wound was dealt while at an ocean setting, this wound would damage the opposing Crew which would be dealt to the Warship. If this wound was dealt while your warship is docked, such as when at an island, this wound would be dealt to the characters themselves. The number of wounds would then be added to those cards.
Note: Wounds are always rounded down if the value is over a whole number. Unless otherwise stated, if an attack roll results in less than 1 Damage (let’s say 0.5) it instead deals a stress to that character.


Note: When rolling dice, if you were to roll double digits with the variable die, the constant die would then use BOTH the first and second digits for determining damage. This keeps higher rolls in the appropriate damage ranges.
Why Wounds are Unique in Blood and Salt tcg
Due to this threshold damage mechanic, characters are able to take and deal wounds in ways that are largely abnormal to most card games.
Wounds that are “Impending”, meaning they will be dealt to the character over time or when triggered, are placed above a character when dealt. Damage over time (DOT) such as a “Bleed 2 over 1 move” or “Bleed 1 over 1 move” are represented in the graphic below as wounds above the character card. When this character travels to the next setting and their character turn is taken, the wounds will shift left and any wounds on the left most stack are dealt to that character. Damage over time effects can be found as bleeds, poisons, terrors, sinkings, and more.
Another special wound type is an “Exertion”, a wound that causes a character to lose health much like a wound but cannot result in the death of the character. Typically this is used to represent effort for some other payoff or debt.
Additionally, if you were to get a large attack off you may deal several wounds at once, known as a “Severe Wound” dealing multiple wounds within one attack.
Loot and travel at your own peril.

Impending damage on a character is placed above character cards. Here, the first circled column of wounds represent a “bleed 2 over 1 move” that will deal 2 wounds upon the next travel of this character’s crew. Similarly the single impending wound represents a “bleed 1 over 1 move” of the same effect. The horizontal wounds circled represent 2 wounds already dealt to this character as “exertions”.
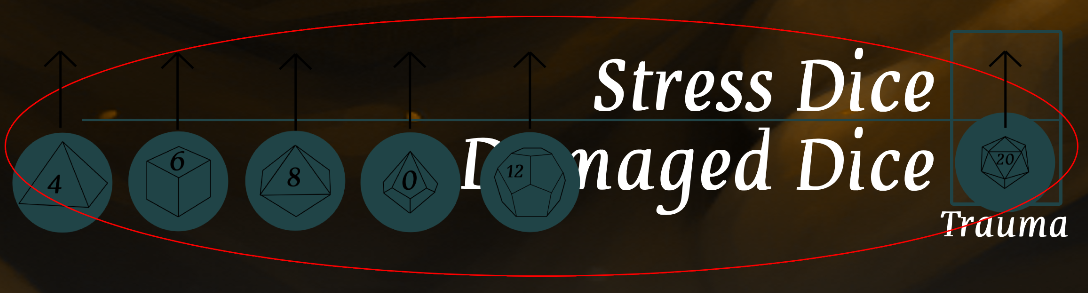
Stress Damage
Wounds are not the only way to dismantle a crew however. Key to managing your Crew is a Captain’s “Sanity” (Light Blue) and “Stress Limit” (Light Red) as circled in the graphic below.

When Captain’s take wounds or other damage types they must also take stress. This is done by moving a number of dice from the “Stress Dice” zone down into the “Damaged Dice” zone equal to the damage taken.

When all the dice have become damaged it triggers “Trauma”. This resets all of the dice and your Captain must add a trauma counter. If your Captain has trauma counters equal to their “Stress Limit” they die of stress.


Though know that there are ways to mitigate and altogether remove stress from a Captain and their Crew but not traumas. Through abilities, equipment, settings, rolling doubles to score critical rolls, and more stress can be managed but is designed to ever creep up to push your luck.


Sanity and Sanity Tests
To the keen eye, you might have noticed that the “Sanity” of a Captain is lower than the Stress Limit of a Captain. “Sanity”, both the amount of trauma a Captain can take before their sanity is tested and also the amount of cards your Crew draws each travel, may drastically change the dynamic of your crew.
When your Captain has trauma counters equal to their sanity, their sanity must be tested, triggering a “Sanity Test”. This involves rolling a d10 + d6 together for the outcome.

The d10 determines whether the Captain will become Corrupted or Noble.
0 - 6: Corrupted
7 - 9: Noble
The d6 determines which of the traits under Corrupted or Noble that Captain will gain from the test.
Corrupted: Highly destructive and disrupting, corrupted traits bring out the true colors of Captain’s who have slipped from their moral ways.

Noble: Honorable and worthy, these Captains take on traits that strengthen their team and uplift the Crew as a whole, at times carrying the burdens of unfathomable weight.

Note: We recommend using dice or counters to keep track of wounds and other sources of damage and stress. As a personal favorite, I have been using colored glass beads (dragon tears as I call them).
Traveling
The Travel Phase
The Ability Phase
The Rest Phase
The first decision you will have to make once your Crew is set to sail in Blood and Salt TCG is where you will choose to go.
Through the course of the game, players will play a series of settings to determine where each crew will have to travel to in hopes of commanding the increasing tides. This aspect of Blood and Salt TCG brings forth the “clock” of the game as the world endlessly floods and players race to higher elevations.
1) The player who was chosen to go first resolves any start of turn abilities and then plays the first setting from their path deck. This is the setting where all Crews start from.

2) Following the first setting, when a player chooses to travel and there is not a setting to move to, those settings are played by opposing players in clockwise order. Each setting ability is resolved as each Crew travels to them so be careful not to harm yourself too badly along the way! Playing settings proceed this way as Crews move into higher tides every 2 or 3 settings depending on the format.
Note: Each setting will have the keywords “Tide Lock”. This means that once the Tides have reached the stated tide level, that setting becomes “flooded” instead becoming an ocean setting and nullifying its ability if the tides are higher than the stated “Tide Lock” the setting was played in. Keep in mind the elevation of your settings when determining how you want your Crew to travel the world of Blood and Salt.

Flooding Tides
The Player that travels to the last flooded setting first and survives commands the high ground and wins. This is the region that your Crew will be at its weakest having used most of its abilities and expended most if not all of their equipment and provisions to get this far.
Scratch and claw your way to victory as every setting is now an ocean.

High Tides
At this point in the game that you may find your Crew in interesting situations that will require you to work your way through them. At one point you will feel safe and at another moment risking another move to keep up with the clock.

Rising Tides
The tides have risen and the middle of the game has started. It is likely that some characters are wounded or equipment has been expended at this point in the game.

Low Tides
The first region of the game, this is the region that your Crew will be the most healthy starting with everything at their disposal they brought.
3) After each travel the combat begins in the Ability Phase as players attempt to bounty hunt each other as they progress towards victory.
Taking Action
The Travel Phase
The Ability Phase
The Rest Phase
The main conflict of Blood and Salt TCG happens within the Ability Phase. This is where you will use the abilities on your Captain and Crewmembers as well as any cards from hand or zone as allowed to generate resources, play cards, perform attack rolls, deflect or block attacks, and react to impending or inevitable wounds.
Character Turns
In order for your Crew to join in on the combat, they must expend “Character Turns”, key aspects of the strategy of Blood and Salt TCG. Each player travel, also known as a move, each player gets 4 character turns and each character in their crew is given at least 1 character turn. Any character turns that are left over may be used by a character which has already used a turn.
A character’s turn is expended when a player decides to use an ability from a character card or an ability from hand onto a character card and pulls that character down to cover the character turn bar to represent that character’s turn being expended.


After a character’s turn has been expended, that character may temporarily gain back its turn if any cards played by that character had the keywords “with haste” on it. If so, the character may use another of your Character’s character turns or another of their own but will lose it if nothing is played in which case that player is then forced to expend that character and use their next character turn.

Following the play of Seeing Things, the character that used this ability may gain back their character turn due to the keywords “with haste”.
How to play cards
Cards are played by declaring the card that is to be played and then generating the resources to play it only if the player does not already have enough resources to play it.
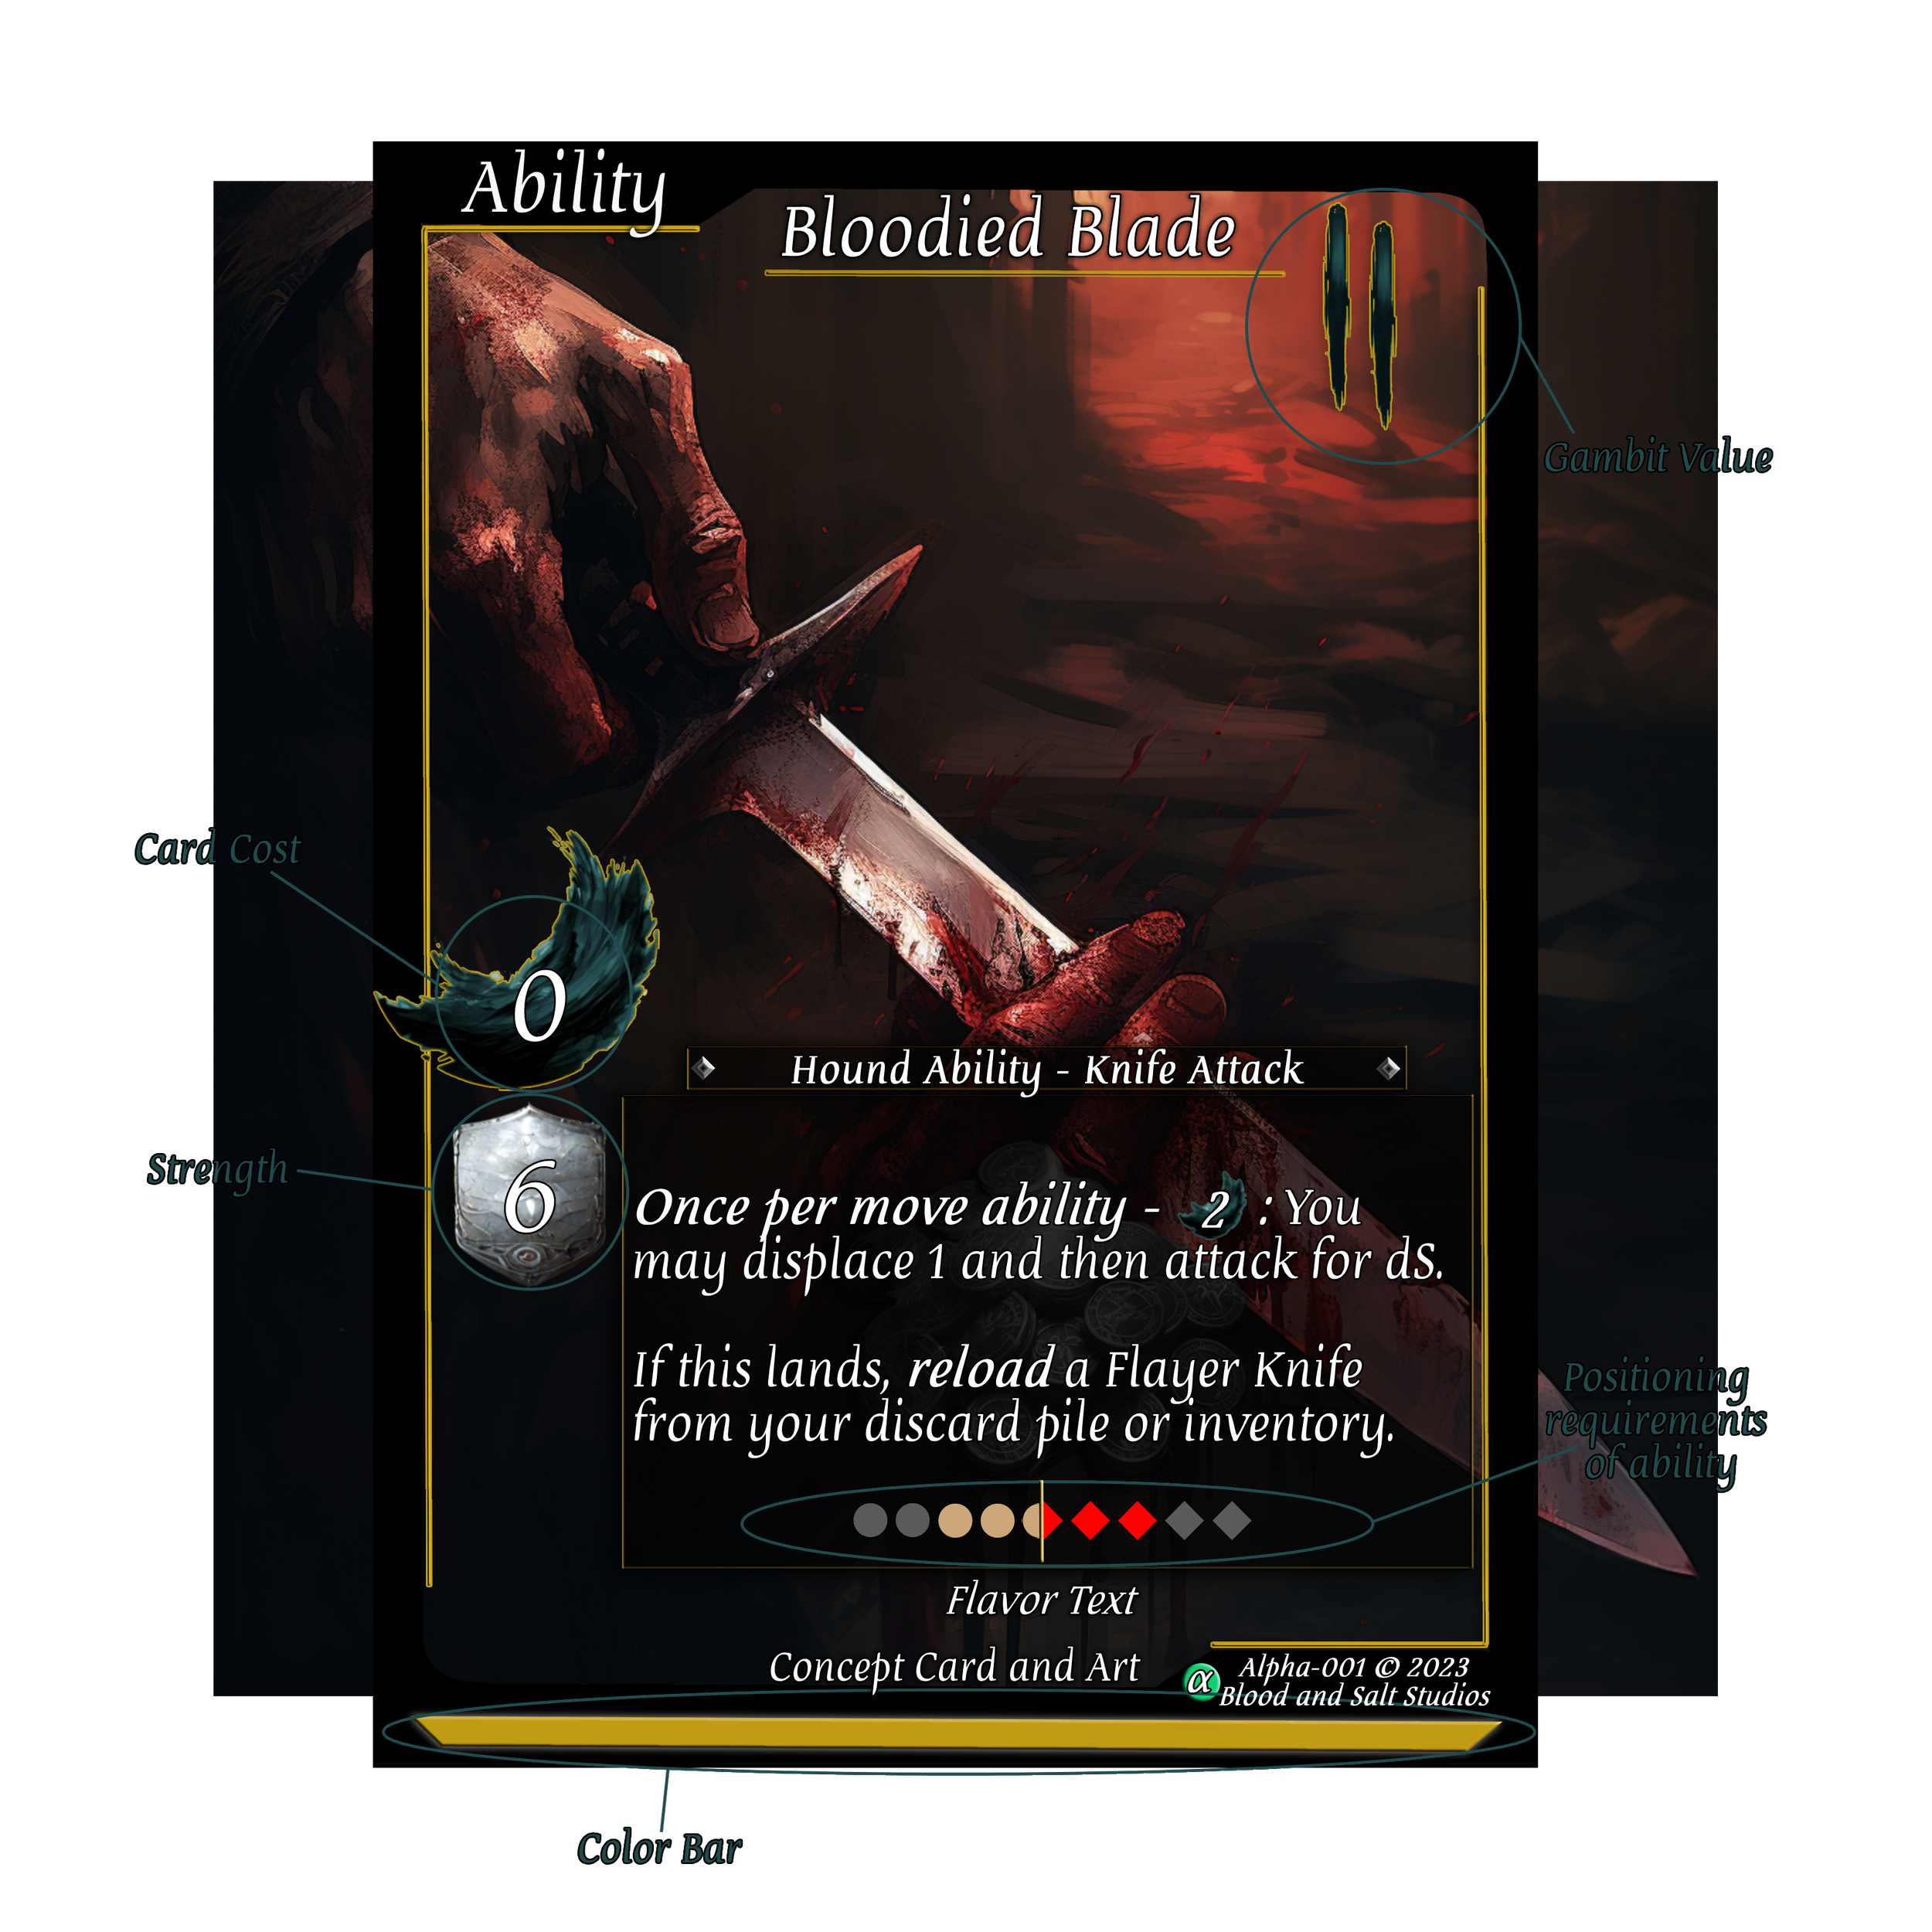
This generation of resources is what we refer to as a “Gambit” that will net the player resources known as “Knots”. To do this, the player selects the card or ability that they wish to play and then gambits a card from hand, placing it into the gambit pile next to their main deck, which will grant them 1, 2, or 3 knots based on the color of the card. This “gambit value” of a card is also represented in the top right corner of the card as well as being represented by the colors purple (3), yellow (2), and green (1) found on the color bar and surrounding boarders of the card for ease of recognition.
Unique cards are represented by their card name, Gambit Value, AND colors.
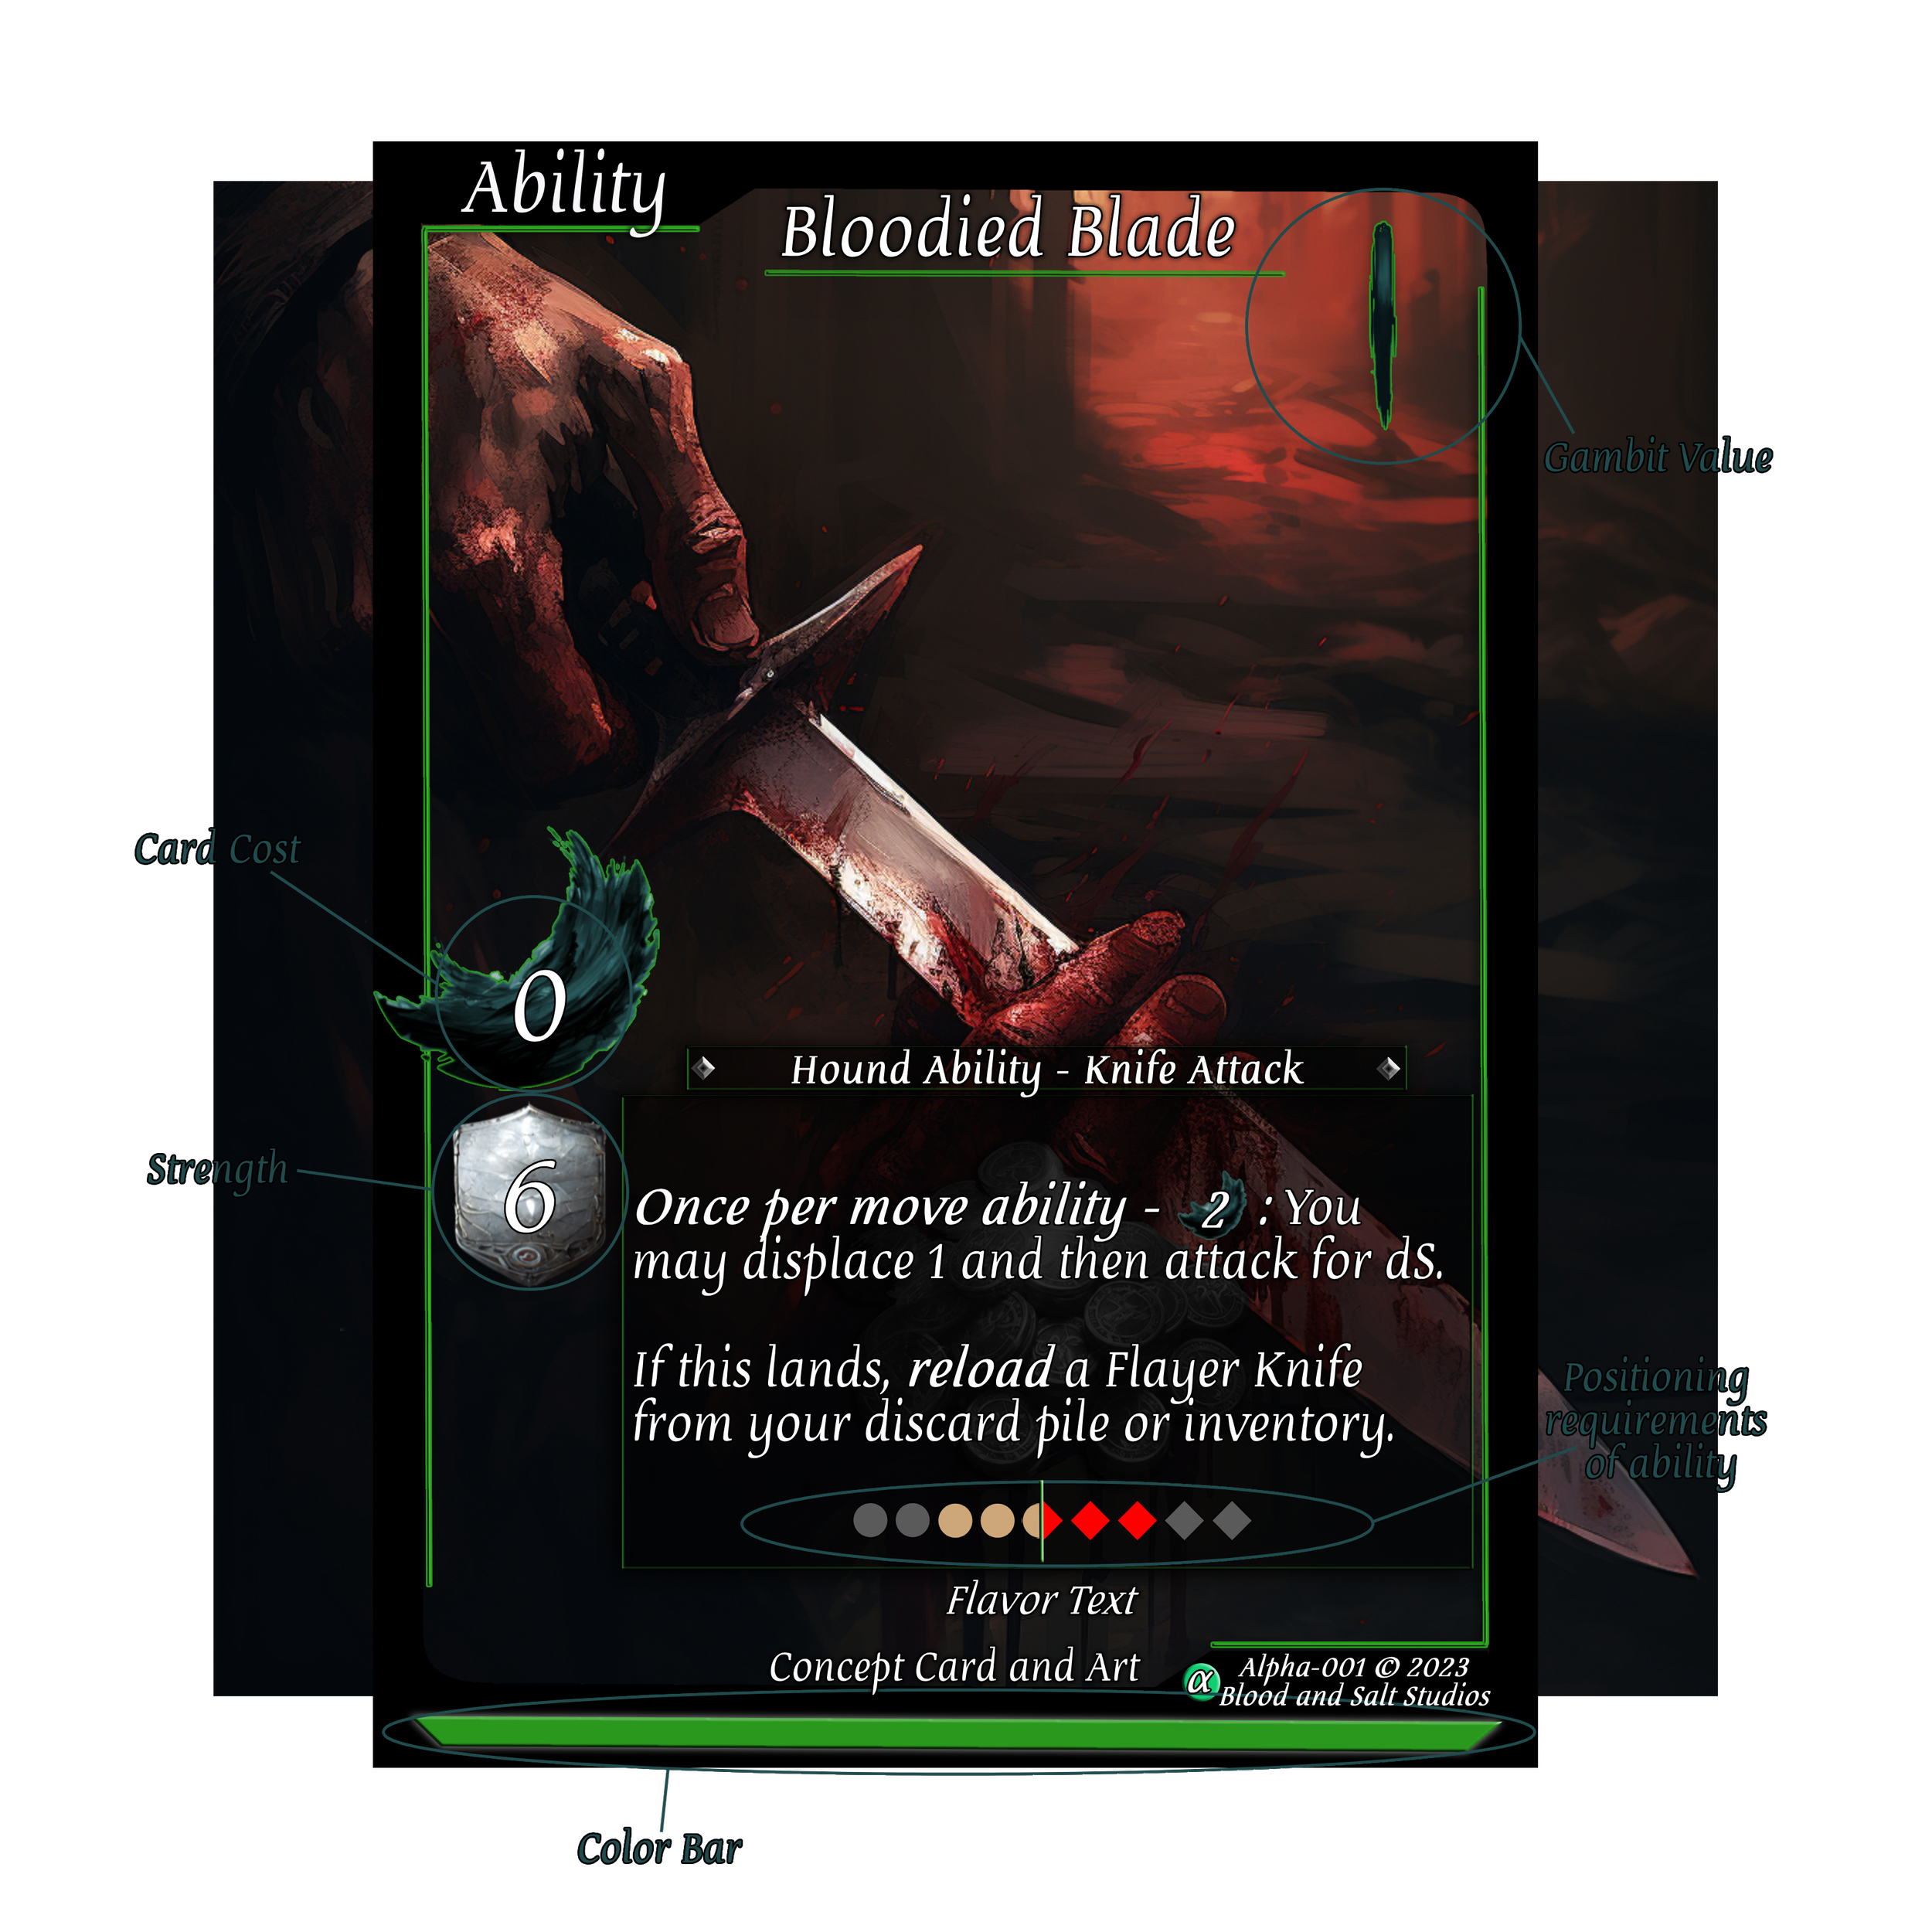
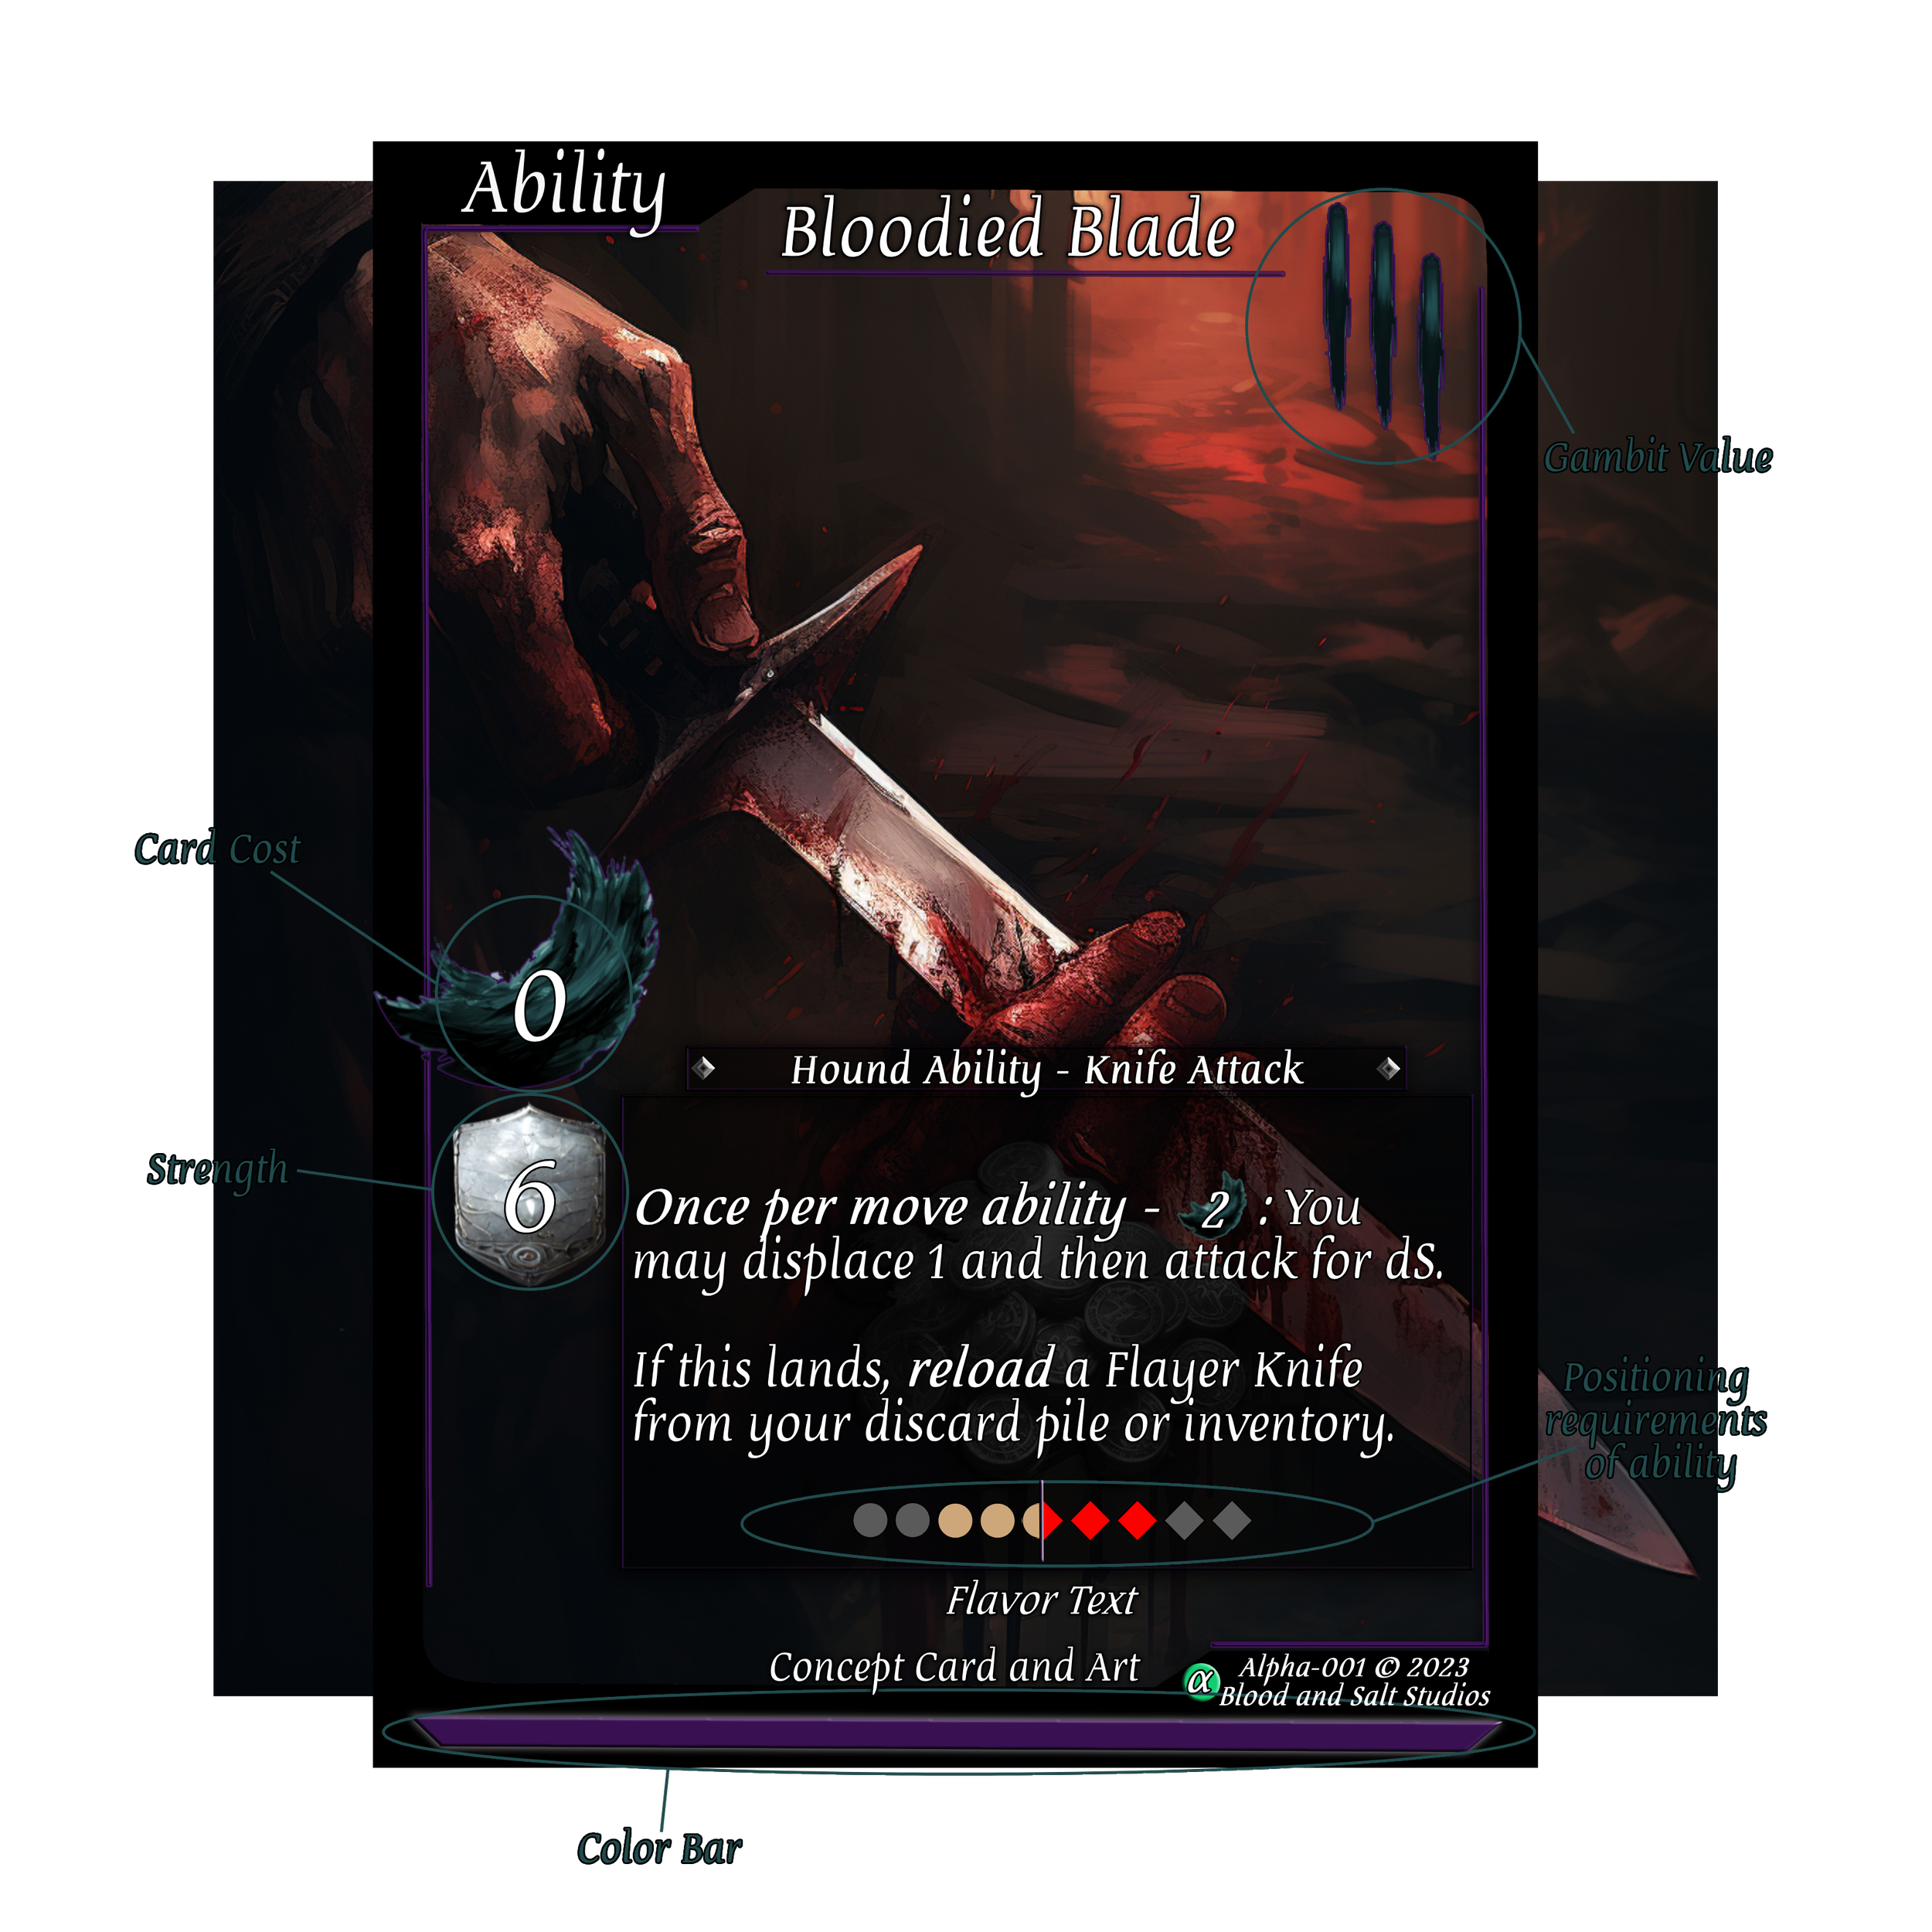
Note: It can be noticed that the same cards may have different gambit values, and thus different colors. This difference in resource generation is counter balanced by the cards having slightly different ability values. Thus, a purple card that generates (3) knots will have a weaker effect than the same card in green that generates (1) knot. For these reasons, cards are considered to be unique cards if they have a different name and a different gambit value.
Positioning
After you have decided that you wish to play an ability on a character turn and have paid the costs, you must determine if that character is in the right “Position” to be able to use that ability. Positions that a card may be used from are represented by a tan circle on a card and positions that the card cannot be used from are represented by a grey circle unless otherwise stated. If the character is in a position that is usable for that ability, your next step is to choose who to target.
When targeting, you must choose which opponent character you wish to target that ability with. Much like being able to use a card from a specific position, a card may only target specific opponent positions. Positions that a card may target are represented by a red square and positions that a card cannot target are represented by a grey square unless otherwise stated.
Note: The position closest to your opponents characters is your position 1. Position nomenclature then increases by 1 for each position away from your position 1. Therefore, you control 4 positions if you do not control the center position and 5 positions if you do.
There are 4 positions that each Player’s Crew controls at all times as well as a position between both Crews that may be controlled by either Player at any time by Displacing a character into that position.

Once an ability has been correctly used from a position and is correctly being targeted, if that card has the word “attack” on it, it starts an engagement with that character and an attack roll is committed.
Critical rolls
From attack rolls to healing to damaging your dice and taking stress, dice are a large part of Blood and Salt TCG. During games, you will find that you have rolled doubles between your constant and variable dice. This results in a “Critical Roll”!
Critical rolls give several positive effects to your character turn in addition to increasing the roll value such as healing a stress from your Crew and giving additional effects to rolls and abilities.
Time to hit big!
Constant Die
Variable Die
If we look at an example where a critical was rolled you will notice there is a slight change to the formula used for calculating damage that makes a big difference. Critical rolls take half the sum of the added constant and variable dice rolls and adds it in addition to that roll. Then restore 1 stress from your Crew.
Example:
Original Formula of a 7 Strength roll without Critical:
[(1st Digit of the Constant Die value + Variable Die value) + Strength of the card used] / Strength of the Target
= [(60 + 6) + 7] / Strength of the Target
= [19] / Strength of the Target (Let’s say 8 Strength)
= 2.375 rounded down for wounds = 2 Wounds Dealt
Critical Formula of a 7 Strength roll with Critical:
[“Critical!” 1.5 (1st Digit of the Constant Die value + Variable Die value) + Strength of the card used] / Strength of the Target
= [1.5 (60 + 6) + 7] / Strength of the Target
= [25] / Strength of the Target (Let’s say 8 Strength)
= 3.125 rounded down for wounds = 3 Wounds Dealt + Restore 1 Stress from your Crew
reactions
So what if your attack didn’t get over that next threshold but you were right there! If you had a card in hand that had “reaction” on it? That card may turn the tides of that attack or defense.

Reactions are cards that may be used in response to some condition such as an attack, deflect, or block that will be discussed next. Typically this is further classified as an “Attack Reaction” or “Defense Reaction”. These cards will have various effects that impact an attack or defense such reducing the attack roll, increasing the strength of the character being attacked, or increasing the impending wounds of an attack to name a few.
If no reactions are wanting to be used by any players, incoming damage is dealt to all targeted characters. Any cards that were used for the attack and defense are moved to their respective discard piles and the character that expended their turn displaces down to cover the “Character Turn Bar”.
Deflecting, Blocking, and Evading Attacks
Cards in Blood and Salt TCG can be used for their ability, to generate resources, and lastly to defend. Defending with cards from hand is what will keep your characters alive but brings tough decisions to the forefront.
Let’s take a look at our previous example of wounding a character from an attack roll:

Deflecting
When we had calculated how many wounds this attack would inflict we came to the conclusion of 1 incoming Wound. However, the defending player can make the choice to use a card from hand to “Deflect” this attack.

By deflecting the attack, the defender has chosen to lose a card from hand but in turn stops the incoming wound and instead deflects back a stress to the attacking card. Though this is not the only way to prevent an incoming wound.
Blocking
Another way to prevent a wound is to “Block” that incoming wound, typically done by choosing to damage your equipment by placing them horizontally onto the target just like deflecting.


Evading
Evading is the last way to avoid an attack but is only used for attacks that cannot be deflected, known as “Inevitable Attacks”. Particularly dangerous and typically carrying damaging effects if they land, “Inevitable Attacks” are what shake up the dance of Blood and Salt TCG and make the game more of a rhythm game intended to keep you on your toes and reactive even when on the attack. While inevitable attacks cannot be deflected they can be blocked or evaded.
Evading an inevitable attack must start by first exerting the targeted character. They are then allowed to attempt to match the incoming wounds of the inevitable attack with cards from hand similar to deflecting. This results in a few outcomes:
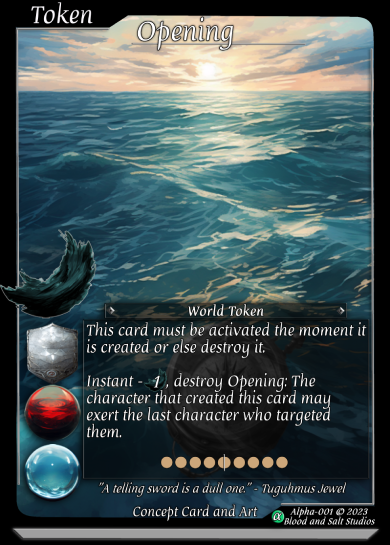
1) If they can match the wounds, that character must displace positions according to the inevitable attack being used. If done, they will evade the attack and will create an “Opening Token”, a token that will be well available to players as a token card in booster packs that allows that character to briefly strike back.
2) If they can only match some of the wounds, the other incoming wounds will be dealt and any effects upon landing will trigger. Though, the target does not need to displace but may.

A “Thrusting” inevitable attack

A “Sweeping” inevitable attack

A “Crushing” inevitable attack
Corpses
Effecting combat beyond death, corpses play a large part in the integrity of the combat of Blood and Salt TCG. When characters die in Blood and Salt TCG, they do not leave the playing field immediately but instead flip to their card back where they become corpses.

These corpses are so important to the gameplay because they keep the position of the character that was killed until that corpse has been damaged or removed. At that point the character then leaves the playing field and is placed into the “Dead Pile”.
In a game that is so focused on positional usage of cards, this results in a temporary time where the positioning of your Crew will be maintained. This is useful to the game for several reasons:
1) The positional emphasis of the game is reinforced.
2) The Crew losing a character is given a small buffer to adjust their positional tactics to account for the lose of that character. This is especially important in the middle of combat since positional abilities need to be accounted for.
3) Thematically it captures the often bitter consequences of war and bittersweet consequences of expedition that we are seeking to capture with this game.
Mastery of the corpse mechanics as a component of the positional gameplay is an important aspect of Blood and Salt TCG.
REsting and Recovering
The Travel Phase
The Ability Phase
The Rest Phase
The Rest Phase is the phase of the game taken by the Traveling Player’s Captain and Crew after all character turns have been used by both players and thus the travel to a setting by the Traveling Player is now complete. In this phase they make the decision to continue traveling or stop to rest and swap roles with the opposition, giving them the opportunity to travel up the setting path.
Once all character turns have been expended or passed on by players for the travel, they may choose to travel again with their current cards in hand and in play or forgo travel to draw up to their Sanity and switch Player turns. When your Crew decides to rest rather than continue to travel, it is an opportunity to catch your breath briefly before getting back into the action. In this phase, you will be able to recover using provisions held by your Crewmembers, resting abilities if you have firewood, and other character or ability cards.
Note: When a Crewmember uses a provision they are holding, it does not expend their character turn which is why you can use provisions after expending all character turns.

Front side

Back side
When constructing your adventure consider what types of resting abilities might find you the greatest advantages or help with your survival.
resting Abilities
Resting Abilities are abilities that each of your Crewmembers posses that can be used to mitigate damages, restore stress, heal wounds, or even buff each other. Dealing with a lot of sharp weapons from the opposition? Make sure one of your Crewmembers possesses the ability to tend to wounds so that you can remove those pesky bleeds. Find that your Crew is being overburdened with stress? It might be a worthwhile idea to have your Crewmembers sit by the fire for a while and compose themselves.
Additionally, much like abilities, Captains will possess resting abilities that are distinctive to their character or story that provide unique and powerful effects to muster the strength of your Crew to continue.


Now that you know the basics of the game, jump on in! It is from our experiences that learning the game is best done with another player as you bounce ideas off of each other. You can find the free Print & Play Luwal Welcome Deck here to get started or look below for more advances keywords and concepts!
Advanced Concepts
Instants - Instants are a special card type that do not use up the character turn when used. These effects are resolved immediately upon being played.
Equipment - Equipment is a type of possession card that is carried by your Captain that may be used to reinforce combos, block impending damage, or give many other various effects. Using equipment correctly and at the right times will be paramount to the survival of your Crew.
Weapons - Weapons are a type of possession card that is carried by your Captain that may be used for attacks, deflects, or other various effects that support the Captains.
Artifacts - Artifacts are uniquely powerful possessions that are harder to remove from the game then typical equipment. Such items may include renowned warships, weapons, crowns, and more.
Some of the Keywords
Heal - Remove a wound from a Crewmember you control.
Restore - Remove a stress from your Captain.
Displace - The amount of positions that a card may force a Crewmember to move. Also, as an additional action for a Crewmember, they may choose to expend their character turn to displace up to 2 positions in a direction.
Strengthen Dice - For your next roll this travel, you may roll with the next highest primary dice threshold (Example: If you would roll with the d6 as the primary die you would now roll the d8).
Weaken Dice - For your next roll this travel, you must roll with the next lowest primary dice threshold (Example: If you would roll with the d6 as the primary die you would now roll the d4).
Damage +X - When you would deal a wound, deal that many wounds + X.
Bleed X over Y - Give a character X bleed counters over Y travels. At the start of each of that character’s travels, extract X bleed counters from the afflicted card to wound the afflicted card X times.
Sinking X over Y - Give a warship X sinking counters over Y travels. At the start of each of that warship’s travels, extract X sinking counters from the afflicted card to wound the afflicted card X times.
Inevitable - This card cannot be deflected. It may be evaded by the target by exerting followed by discarding cards from hand equal to the incoming wounds. If evasion is successful, they create an Opening token.
Guard - Displace to the position in front of the target Crewmember. The guarding character is dealt the next damage and effects from an attack for the guarded character.
Rogue - This character cannot be played with other crewmembers you control.
Tide Level - As the Crew travels the world will continue to endlessly flood raising the tide levels. The tides will go from Low Tide to Rising Tide to High Tide to Flooding Tide.
Flooded - This setting has been covered in salt water and has become an ocean setting, nullifying its card abilities if the tide level is greater than the stated tide.
Tide Locked - Once the Tides have reached the stated tide level, Low, Rising, High, or Flooding, that setting gains the keyword flooded.
Recent Articles

Why a Card Game?

Developing a Game Worth Collecting.
Set 1: An Endless Rain Card Gallery

Click here to See Set 1: An Endless Rain
Check out the first set of Blood and Salt TCG, in progress now!